by Anastassia Skarlinski
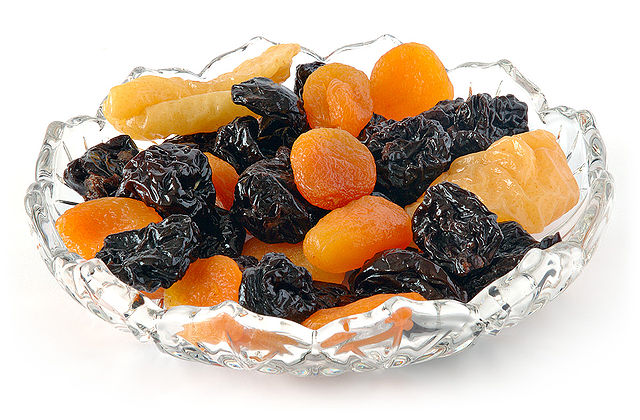
Dried fruits are often just the punchline. People make fun of the raisins in oatmeal cookies and prune juice. We think of them as joke foods, things that no one actually wants to eat. Which is a shame as dried fruits offer some awesome benefits.
Experts believe that we discovered dried fruits by accident. Either someone forgot to bring in the crop on time or someone just found fallen fruit; either way, that neglect led to the fruit being dried in the sun, making it chewy and sweet. Accident or not, the earliest mention of dried fruit in writing is from a Mesopotamian clay tablet from 1500 BCE. Dried fruit was highly prized, both back then and now, for its sweetness, shelf life, and nutritional benefits. Because dried fruits are simply fruits with the water removed, they can safely last on the shelf for up to a year. They are a great way to get in servings of fruit when you have limited refrigeration space. A half-cup of dried fruit is typically counted as a serving of fruit.
So, what are their nutritional benefits? While nutritional values can be slightly different depending on the fruit, there are some universal benefits. Generally speaking, dried fruit has the same amount of nutrients as its “undried” counterpart, only in a smaller package. Pound for pound, dried fruit offers up to 3.5 times the fiber and other nutrients of fresh fruits. Some fruits are only sold in the US as dried fruit, such as dates. Date palms are likely the oldest cultivated tree in the world. They are an excellent source of fiber, potassium, magnesium, copper, manganese, vitamin B6, and iron. Raisins, dried grapes, are the most commonly consumed dried fruit worldwide. Raisins are a great source of fiber, iron, calcium, and boron. Boron sounds scary, being on the periodic table and all, but it is an essential mineral. Boron can help your body better absorb calcium and is being researched for its role in cancer prevention and healing. If you have pets, know that some dried fruits can be toxic to animals, and you should make sure to keep them out of reach.
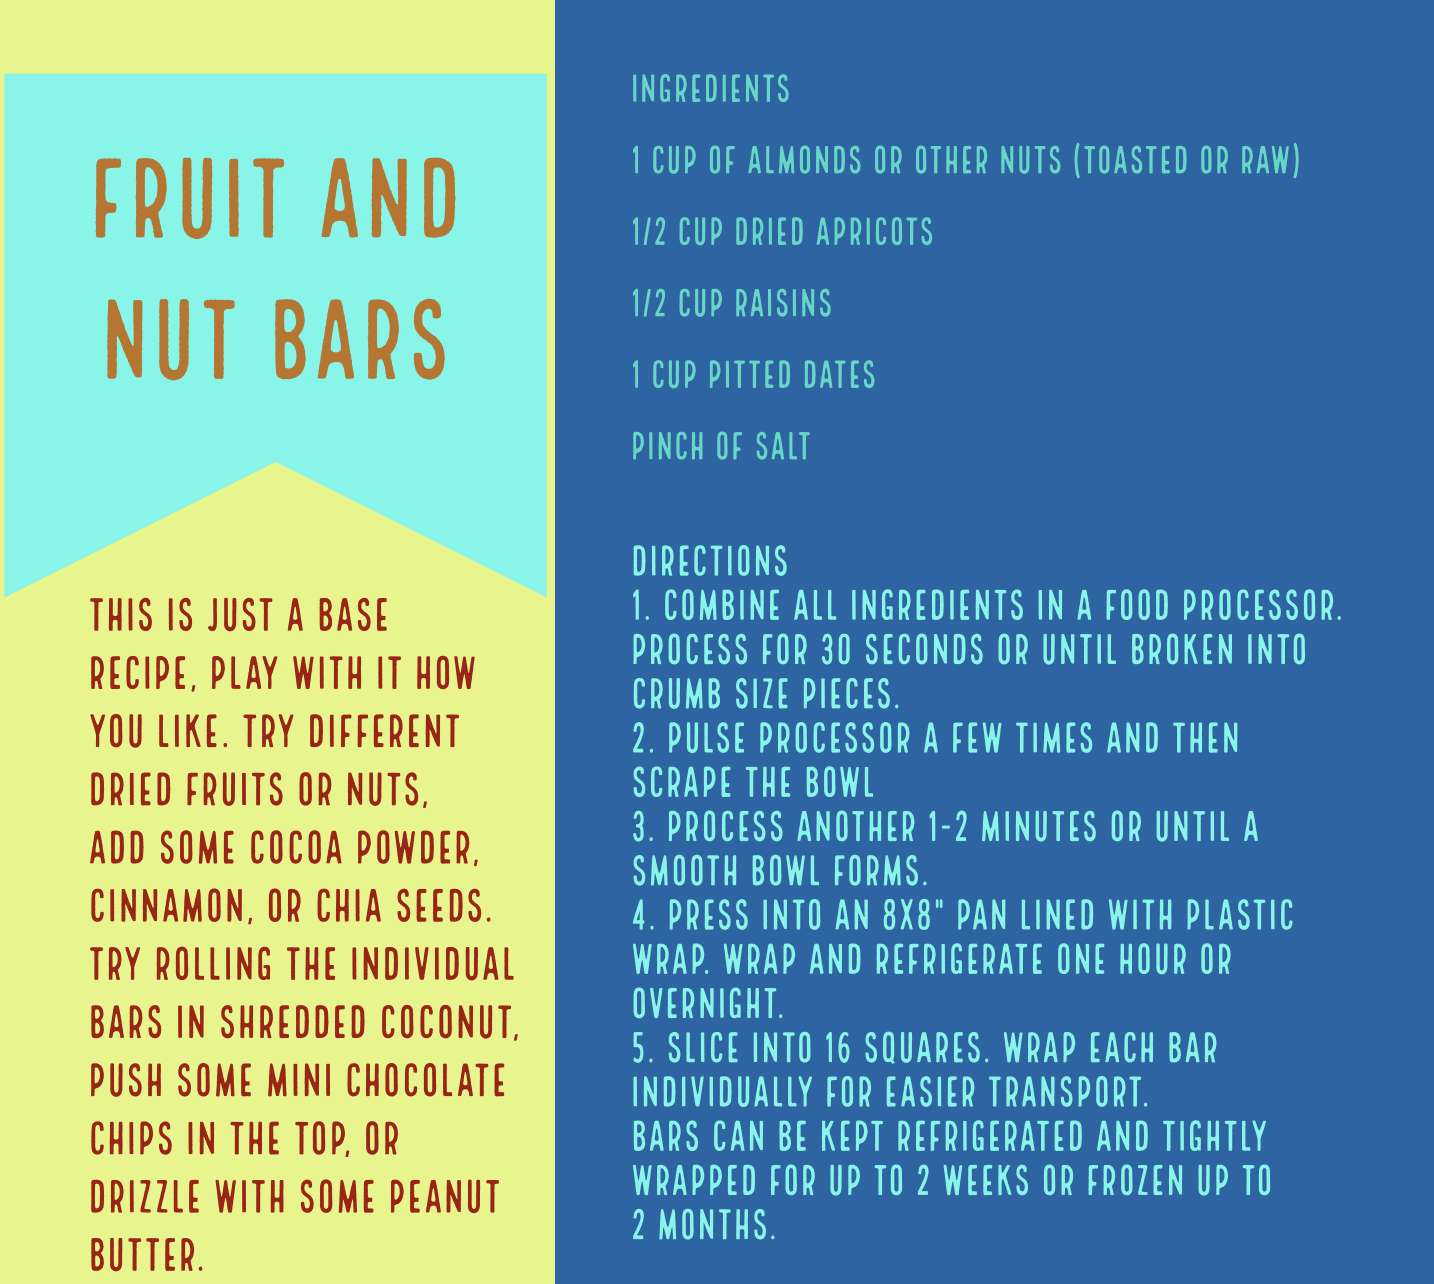
So, what to do with dried fruit? You can just eat it as is or mix it up with some nuts to make a trail mix. You could have some dried fruit with some cheese and call it a charcuterie board if you’re feeling fancy. You can throw dried fruit in your morning cereal, hot or cold, or on top of a salad. There are a ton of recipes to make cakes and cookies with raisins and dates, my family’s current favorite is sticky toffee pudding. Chopped apricots, figs, or dates are often found in savory dishes too, especially in recipes from North Africa. I often make these fruit bars to keep on hand for a quick easy snack. Once made, they can be kept wrapped in the fridge for up to two weeks. This is the base recipe, but you can easily play around with it. Try different fruits or nuts, add some cocoa powder, cinnamon, or chia seeds, and try rolling the individual bars in shredded coconut or drizzling your bars with peanut butter.
Dr. Bulik’s Favorite Easy Date Scones

Easy Date Scones: moist, fluffy date scones. No need to rub the butter into the flour, just a quick mix, and they’re done! Also egg-free.
Cuisine: Modern Australian
Total Time: 30 minutes
Author: Lee-Ann
Origin: https://www.chefnotrequired.com/easy-date-scones/
Ingredients
3 cups / 450g self-raising flour (make sure you use self-raising flour!)
200 ml pure cream
200 ml buttermilk
2 tbsp caster sugar (aka powdered sugar)
1 ½ cups / 200g dried dates
Instructions
1. Preheat oven to 200c (technically 392 degrees F but 400 is close enough!).
2. In a jug, combine the cream and buttermilk, then set aside.
3. Place flour, sugar, and chopped dates into a large bowl, and mix to combine.
4. Add cream mixture to flour, and mix to combine using a flat-bladed knife. For the final few strokes, I bring the dough together with my hands.
5. Turn the dough out onto a lightly floured bench/board and knead the dough lightly until just smooth – should only need about 30 seconds or about 5 – 10 turns. Pat the dough out into an even 2cm / 4/5″ disc.
6. Take a 6cm / 2 1/2″ round cutter, dip it in extra flour and cut out scones. Try not to twist the cutter as you push down and then pull back up through the dough. Nice clean-cut edges will help your scones rise (see notes).
7. Remove any excess dough from around the scones (try not to squish the edges) then place onto a baking tray-again trying not to handle the edges of the scones. Push together the remaining dough scraps and repeat (see notes).
8. Bake for 12 – 15 minutes, or until the tops are golden and they sound hollow when you tap them.
Recipe Notes
A nice clean cut on the sides of your scones will help them rise nice and straight.
With the dough remaining from my first cut, I like to just “push” the scraps back together and then pat them back out flat with minimal kneading. You don’t want to overwork the dough (or add in too much excess rolling flour) or your last scones won’t rise as well and won’t be as fluffy.
I like big date chunks, so don’t chop too finely. It’s like biting into treasure when you find one.
Lastly, I recommend chopping the dates by hand rather than pulsing them in a food processor. Even though the pack says they are seedless, this is not always true! Trust me, I have found some myself. Some of the packs even have a disclaimer that some seeds may be present. If you just put the dates straight into a food processor, any date seeds will go in too!
Websites Consulted
https://www.healthline.com/nutrition/dried-fruit-good-or-bad#TOC_TITLE_HDR_3
http://justfunfacts.com/interesting-facts-about-dried-fruit/
https://nchfp.uga.edu/how/dry/pack_store.html
https://ods.od.nih.gov/factsheets/Boron-HealthProfessional/
https://www.thekitchn.com/how-to-make-easy-3-ingredient-energy-bars-at-home
